Kinesis Advantage2 modification and programming

Introduction #
For the longest time I used a split keyboard, but it wasn’t mechanical and I had heard good things about the comfort and ergonomic benefits of mechanical keyboards. So after lots of research I finally got the Kinesis Advantage2 (KB600 model) - that was almost two years ago. The transition to the Advantage2 was quite difficult but I’ve come to really like it - it’s concave keywells and thumb clusters feel very natural to use.
It is programmable out-of-the-box but uses proprietary software and I found it a bit clunky. I became aware of QMK and wished for that functionality. This post documents the steps to bring QMK Firmware (actually Vial) to the Kinesis Advantage2. As is often the case, this information is already available online but it’s not immediately obvious how to join the dots so here I document the particular path that I took.
Perhaps the most famous modification for the Advantage2 is know as the Stapelberg mod and you can see from that GitHub repository that lots of really good work has been done. However, I came across a reddit post about a variation on that project using a cheaper more readily available controller so that’s the direction I took.
Hardware #
I ordered the PCB and components based on this GitHub repo dcpedit/kint, shortly afterwards that repo was superseded by dcpedit/pillzmod, however functionally there is no difference, at least for the KB600, so we can follow the instructions from the more recent repo.
The PCB, controller and other components were ordered from JLCPCB, AliExpress and Mouser respectively.
Note that AliExpress offer three variants of the same controller, I ordered the F411 25M HSE
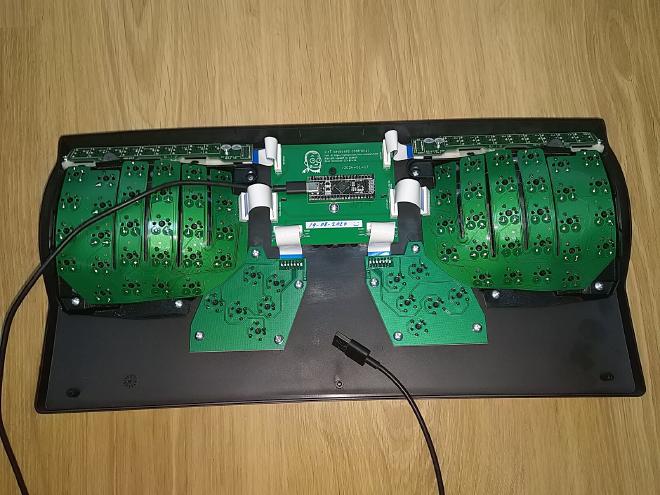
Once everything was soldered onto the PCB the original board was removed from the keyboard and replaced by the new board.
Flashing #
The specific instructions given here are for Ubuntu 22.04 but should be similar for other operating systems.
Plug in the Advantage2 Keyboard to a USB port, also plug in another Keyboard so that we can input the following commands.
Install and test DFU #
DFU is required to download firmware to the controller over USB.
sudo apt install dfu-util
Start the controller in DFU mode by holding BOOT0 button and pressing NRST button. Wait a second and release the BOOT0 button. Then run the command below, if the output is similar to that show here then the board is successfully connected in DFU mode.
sudo dfu-util -l

dfu-util 0.9

Copyright 2005-2009 Weston Schmidt, Harald Welte and OpenMoko Inc.
Copyright 2010-2016 Tormod Volden and Stefan Schmidt
This program is Free Software and has ABSOLUTELY NO WARRANTY
Please report bugs to http://sourceforge.net/p/dfu-util/tickets/

Found DFU: [0483:df11] ver=2200, devnum=7, cfg=1, intf=0, path="1-12", alt=3, name="@Device Feature/0xFFFF0000/01*004 e", serial="395B376D3233"
Found DFU: [0483:df11] ver=2200, devnum=7, cfg=1, intf=0, path="1-12", alt=2, name="@OTP Memory /0x1FFF7800/01*512 e,01*016 e", serial="395B376D3233"
Found DFU: [0483:df11] ver=2200, devnum=7, cfg=1, intf=0, path="1-12", alt=1, name="@Option Bytes  /0x1FFFC000/01*016 e", serial="395B376D3233"
Found DFU: [0483:df11] ver=2200, devnum=7, cfg=1, intf=0, path="1-12", alt=0, name="@Internal Flash  /0x08000000/04*016Kg,01*064Kg,03*128Kg", serial="395B376D3233"
Flash the Firmware #
Note that the source code can be found here: dcpedit/kint-bp
But pre-built firmware is already available here: dcpedit/pillzmod in the firmware directory
Clone the repo with the pre-built firmware locally and run the command below to flash the firmware.
sudo dfu-util -d 0483:df11 -a 0 -s 0x08000000 -D <YOUR-PATH>/pillzmod/firmware/dcpedit_kint_bp_vial_6layers.bin

dfu-util 0.9

Copyright 2005-2009 Weston Schmidt, Harald Welte and OpenMoko Inc.
Copyright 2010-2016 Tormod Volden and Stefan Schmidt
This program is Free Software and has ABSOLUTELY NO WARRANTY
Please report bugs to http://sourceforge.net/p/dfu-util/tickets/

Opening DFU capable USB device...
ID 0483:df11
Run-time device DFU version 011a
Claiming USB DFU Interface...
Setting Alternate Setting #0 ...
Determining device status: state = dfuERROR, status = 10
dfuERROR, clearing status
Determining device status: state = dfuIDLE, status = 0
dfuIDLE, continuing
DFU mode device DFU version 011a
Device returned transfer size 2048
DfuSe interface name: "Internal Flash  "
Downloading to address = 0x08000000, size = 72624
Download	[=========================] 100%        72624 bytes
Download done.
File downloaded successfully
Unplug the board to exit DFU mode.
Then replug again so that the board can be programmed.
Vial #
Vial builds on top on QMK, its main advantage is that once setup the keybindings etc. can be changed without having to re-flash the controller.
AppImage #
You can download vial from: Vial download
This is distributed as an AppImage so you need to install libfuse2
Caution only install libfuse2, see the warning here: libfuse2 installation
apt install libfuse2
udev #
For Vial to detect the Keyboard under Linux we need a custom udev rule:
export USER_GID=`id -g`; sudo --preserve-env=USER_GID sh -c 'echo "KERNEL==\"hidraw*\", SUBSYSTEM==\"hidraw\", ATTRS{serial}==\"*vial:f64c2b3c*\", MODE=\"0660\", GROUP=\"$USER_GID\", TAG+=\"uaccess\", TAG+=\"udev-acl\"" > /etc/udev/rules.d/99-vial.rules && udevadm control --reload && udevadm trigger'
Run Vial #
Set permissions to run the AppImage:
chmod u+x Vial*.AppImage
Finally run Vial:
./Vial-v0.7.1-x86_64.AppImage
Other notes #
Home Row Mods #
If you are interested in Home Row Mods here is a very detailed article, with some discussion on reddit.
QMK #
Some people prefer to use QMK over Vial here is a post about using QMK with the BlackPill.